Proof of Concept Summary
I thought I would start this entry by summarising the results from all of the testing for the auto-locator functions being mimicked by an Arduino Mega.
-
- Power –
 Success
 - Lamps – Success
- Switches – Success
- Displays – Success
- Keypad – Success
- Power –
All functions of the old auto-locators can, indeed, be simulated with the Arduino. I am now moving on to the extra bits required to interface the Arduino with our studio control system.
Our system uses MIDI to control external devices, such as parts of our mastering console, and (very soon) our Crookwood Insert Router. The control software is part of our proprietary mastering software, and every controllable part of our setup can be stored into each project’s folder and archived with the project. I will be incorporating the functionality and user interface needed to control the MTR-12 into this software.
It is time to add the MIDI hardware, and see how slow the Arduino gets. I think it should be fine but, if it is too slow to be useful, I will switch from using MIDI for this to using a straight serial, or USB, interface. This would be an easy change in both hardware and software. I would very much prefer to keep it MIDI though. I envision incorporating MMC (MIDI Machine Control) into the final version, so that a change in state or position on the DAW (Sequoia,) causes an identical change in state on the MTR-12. Such as, if I hit play on the DAW, the MTR-12 goes into Play mode or, if I go back to the top in the DAW, the MTR-12 returns to zero.
Parts for the MIDI Input and Output
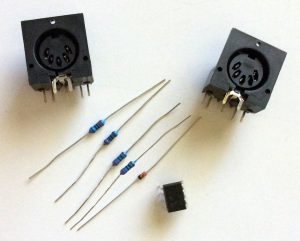
Conforming to the MIDI 1.0 Specification, and taking into account the way the UARTs are designed on the Arduino, I think that these are all of the parts that I should need to create a functioning MIDI input and MIDI output to interface to the Arduino. I have added these parts and their prices to the Parts List entry in this blog.
MIDI Input
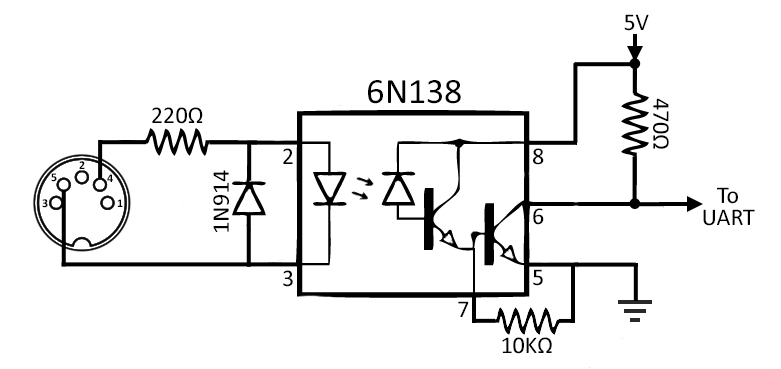
The MIDI input is the more complicated of the two interfaces, although it isn’t very complex. It requires a jack, three resistors, a diode and an optoisolator. The diode is there to protect the circuit from a cable that has been wired backward. The optoisolator eliminates the electrical connection between the two devices you are connecting together, but passes the data through. The spec says to use a 6N138, so I am. You can use other ones, but then you have to change/add other components as well, and I have all of these parts kicking around.
MIDI Output
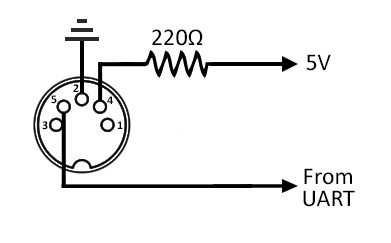
The MIDI output is very simple when connecting to an Arduino. All I should need is a resistor and a jack. To conform with the spec, you normally use a couple of logic gates on the line from the UART, but I don’t think these are needed with the Arduino. I should be able to just connect pin 5 on the jack to the TX line on the Arduino, set the baud rate to 31250, and everything should be fine.
I’m going to build the interface on a small breadboard in the next couple of days. It will swiftly become apparent if I have any wrong-thinking going on.
Stay tuned…