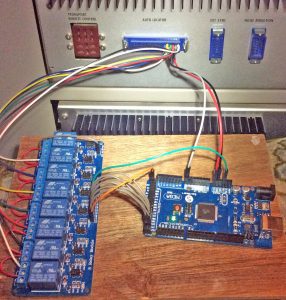
This morning I hooked the whole thing up to the MTR-12, wrote the software, and did some testing.
Software:
For the test software, I added a couple of routines to the lamps program. First, I added the processCommands() routine to accept commands through the serial(USB) port. I wanted to be able to send it a switch number, and have the unit turn that relay on for a brief period of time. As brief as possible. It also has to tell me that the switch has been turned on, so I know what is going on. This routine is only for testing the functionality. I also added the setSwitches() routine to turn the switches on (and off.) This routine also let’s me know when a switch has been turned off.
I have made an array of integers called switches[] and set them all to be zero. If the processCommands() routine receives a number, it changes the appropriate switches[] element to be 500. Every time the Arduino goes through a loop, it calls the setSwitches() routine and, if any of the switches are not zero, it pulls the appropriate relay module pin LOW, thereby activating the relay, and the switches[] element is decremented. Once the switches() element reaches zero, the appropriate pin is pulled HIGH again. This will allow me to see how long the switch needs to stay on in order to trigger the action. 500 loops should be a good starting point.
Here are the new setup() and loop() functions:
void setup() {
pinMode(stopLampPin, INPUT);
pinMode(recordLampPin, INPUT);
pinMode(playLampPin, INPUT);
pinMode(ffwdLampPin, INPUT);
pinMode(rewLampPin, INPUT);
pinMode(searchZLampPin, INPUT);
pinMode(searchLampPin, INPUT);
pinMode(cueLampPin, INPUT);
pinMode(shuttleLampPin, INPUT);
pinMode(autoRewLampPin, INPUT);
pinMode(recSwPin, OUTPUT);
pinMode(playSwPin, OUTPUT);
pinMode(stopSwPin, OUTPUT);
pinMode(rewSwPin, OUTPUT);
pinMode(ffwdSwPin, OUTPUT);
pinMode(cueSwPin, OUTPUT);
pinMode(searchZSwPin, OUTPUT);
Serial.begin(115200);
sendLamps();
}
void loop() {
setSwitches();
getLamps();
if (Serial.available()>0){processCommands();}
}
Testing:
Works great. The video tests all of the switches, except the CUE switch, as that one needs to be held down for the function to be apparent, and I haven’t written a routine for that. This is just proof of concept, remember. I did test that switch, and it does fire, so all is well.
Conclusions:
Well, the first thing you may notice is, when I hit switch 7 (search zero,) the damn lamp still doesn’t come on. Not sure if maybe our machine has a problem in this regard, or if it will fire when I trigger it properly from the fake keypad routine that will be written later on. This was a bit of a shock for me, as I fully expected it to send a searchZ lamp on message.
After I shot this, I fooled around reducing the time that the switches stayed on. When I went down to 75 loops, the MTR-12 stopped responding to the commands, so I increased it to 100 and everything works well. 100 loops on the Arduino is a really short period of time. As I add more functionality to the loop() routine, it will extend the time it takes for each loop to execute, so I should be able to pull that number down in the future versions.
With the lamps and switches working, I will now move on to the more tricky stuff, starting with the time displays. It may take a few days to make progress on this. Stay tuned…